IndexFixer Pro — Setup Guide
Everything from installing the plugin to reading every number in the dashboard — and setting up the indexing widget that actually gets your pages indexed.
1. Install the plugin
- Log in to your ZinkWP account at api.zinkwp.com/login (you set the password from the email you received after purchase).
- Download the latest
indexfixer-pro-x.x.x.zipfrom your account panel. - In WordPress go to Plugins → Add New → Upload Plugin, pick the zip, click Install Now, then Activate.
A new IndexFixer item appears in the left admin menu.
2. Connect your account & Search Console
Two one-click steps, no license keys and no Google Cloud setup:
- Connect Your Account — the plugin shows a big button on first run. It opens zinkwp.com, you confirm, and you're back in WordPress. This links the site to your subscription.
- Connect Google Search Console — second button. You pick the Google account that owns the site's Search Console property and grant read-only access. That's the only permission we ask for.
After connecting you'll see a short "Collecting data" screen. The first scan usually takes a few minutes; big sites can take longer (Google allows up to 2,000 URL inspections per day per site). The dashboard unlocks automatically.
3. The Overview tab — what the numbers mean
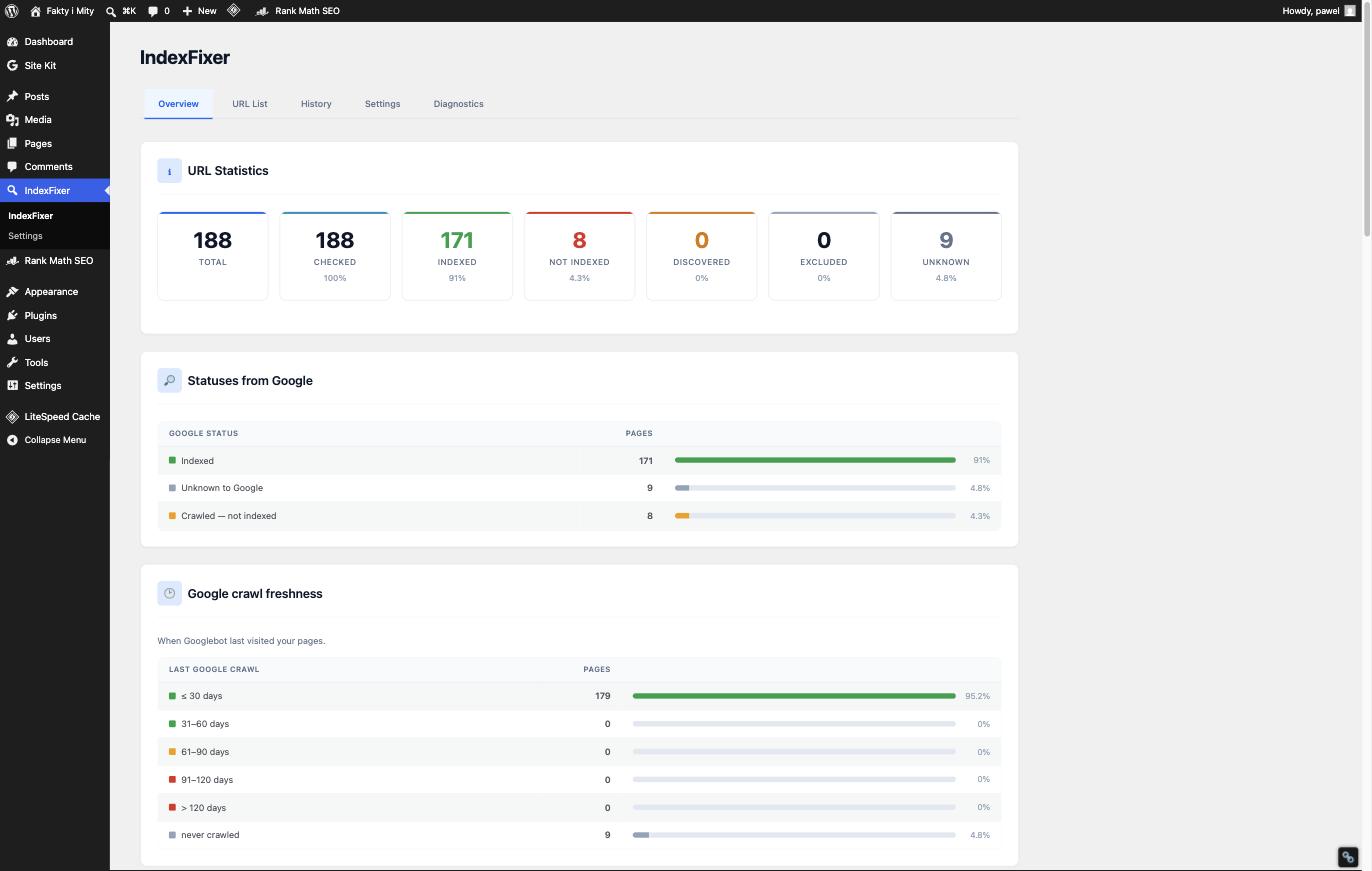
URL Statistics
| Card | Meaning |
|---|---|
| TOTAL | All published URLs IndexFixer tracks (per the post types you selected in Settings). |
| CHECKED | How many of them already have a result from Google's URL Inspection. Fresh installs start at 0% and climb as the daily budget is used. |
| INDEXED | Pages confirmed in Google's index. This is the number you want to grow. |
| NOT INDEXED | Google knows the page (usually crawled it) but decided not to index it — typically a content-quality signal. These are the pages the widget works on. |
| DISCOVERED | Google has seen the URL (e.g. in your sitemap) but hasn't crawled it yet. |
| EXCLUDED | Technically blocked or excluded: redirects, 404s, noindex, robots.txt, canonicals pointing elsewhere. |
| UNKNOWN | Google has never heard of this URL at all — common for brand-new posts. |
Statuses from Google
The same data grouped by Google's own coverage labels (e.g. "Submitted and indexed", "Crawled — currently not indexed", "URL is unknown to Google"). This is exactly what Search Console would tell you — for every URL at once.
Google crawl freshness
When Googlebot last visited your pages. Healthy, active sites keep most pages in the ≤ 30 days bucket. If a large share of pages hasn't been crawled for 90+ days, Google is losing interest — the widget (below) is the fix.
4. The URL List — column by column
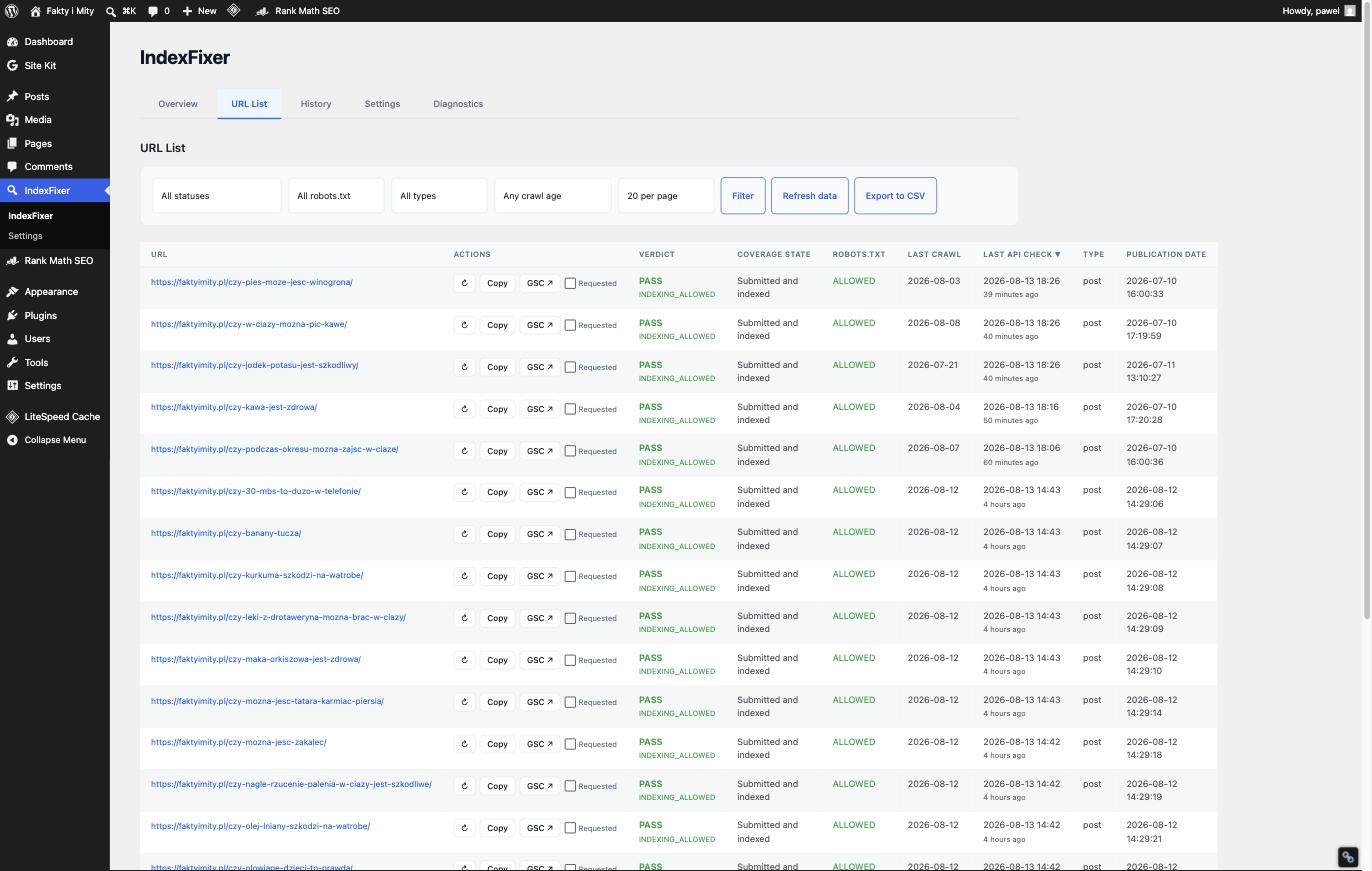
| Column | Meaning |
|---|---|
| VERDICT | Google's overall verdict for the URL: PASS indexed / indexable, NEUTRAL excluded by design, FAIL blocked or error. INDEXING_ALLOWED underneath confirms nothing blocks indexing. |
| COVERAGE STATE | Google's detailed label — same wording as Search Console ("Submitted and indexed", "Crawled — currently not indexed"…). |
| ROBOTS.TXT | Whether your robots.txt allows Google to crawl this URL. |
| LAST CRAWL | When Googlebot last fetched the page. This date comes from Google and can be weeks old. |
| LAST API CHECK | When IndexFixer last asked Google about this URL. Don't confuse the two: a check from 5 minutes ago can still report a crawl from last month. |
| ACTIONS | ↻ re-check the URL now · Copy the URL · GSC ↗ open this exact URL in Search Console's inspection view. |
Use the filters on top (status, robots, type, crawl age) and Export to CSV for offline analysis.
5. The indexing widget — the part that actually fixes indexing
Most plugins stop at reporting. IndexFixer ships a front-end widget that lists your not-indexed posts as real internal links. Googlebot finds those links on pages it already crawls and follows them straight to the pages it's been missing. Once a page turns indexed, it drops out of the widget automatically and the next not-indexed page takes its place. URLs shown in the widget are also checked with priority, so the loop keeps turning.
What makes it different: links that move
Static internal linking gives every article the same links forever. The widget is dynamic — it always points at the pages that need discovery most right now:
today:            every page  →  /article-8472/    (Googlebot has never crawled it)
tomorrow:         every page  →  /article-9211/    (not crawled for 94 days)
after it indexes: every page  →  /article-10482/   (next in line)
Ordering is by neglect: pages Googlebot has never crawled come first, then the ones it hasn't visited longest — and only live, published pages ever make the list. Google's own documentation says internal links are the primary way it discovers a site's pages; the widget simply makes sure those links always point where they're currently needed.
Crawling ≠ indexing — what the loop can and can't do
Google separates crawling from indexing: after crawling a page it still decides whether to index it (quality, uniqueness, canonicals). The loop removes the discovery bottleneck — "Google can't find this URL, or won't come back to it". It cannot fix "Google saw this page and judged it thin or duplicate". IndexFixer tells you which case you're in:
- Discovered — currently not indexed → a discovery / crawl-budget problem. The widget helps here.
- Crawled — currently not indexed → usually a content-quality signal. Improve the page first; the widget then helps Google revisit it.
How to add it
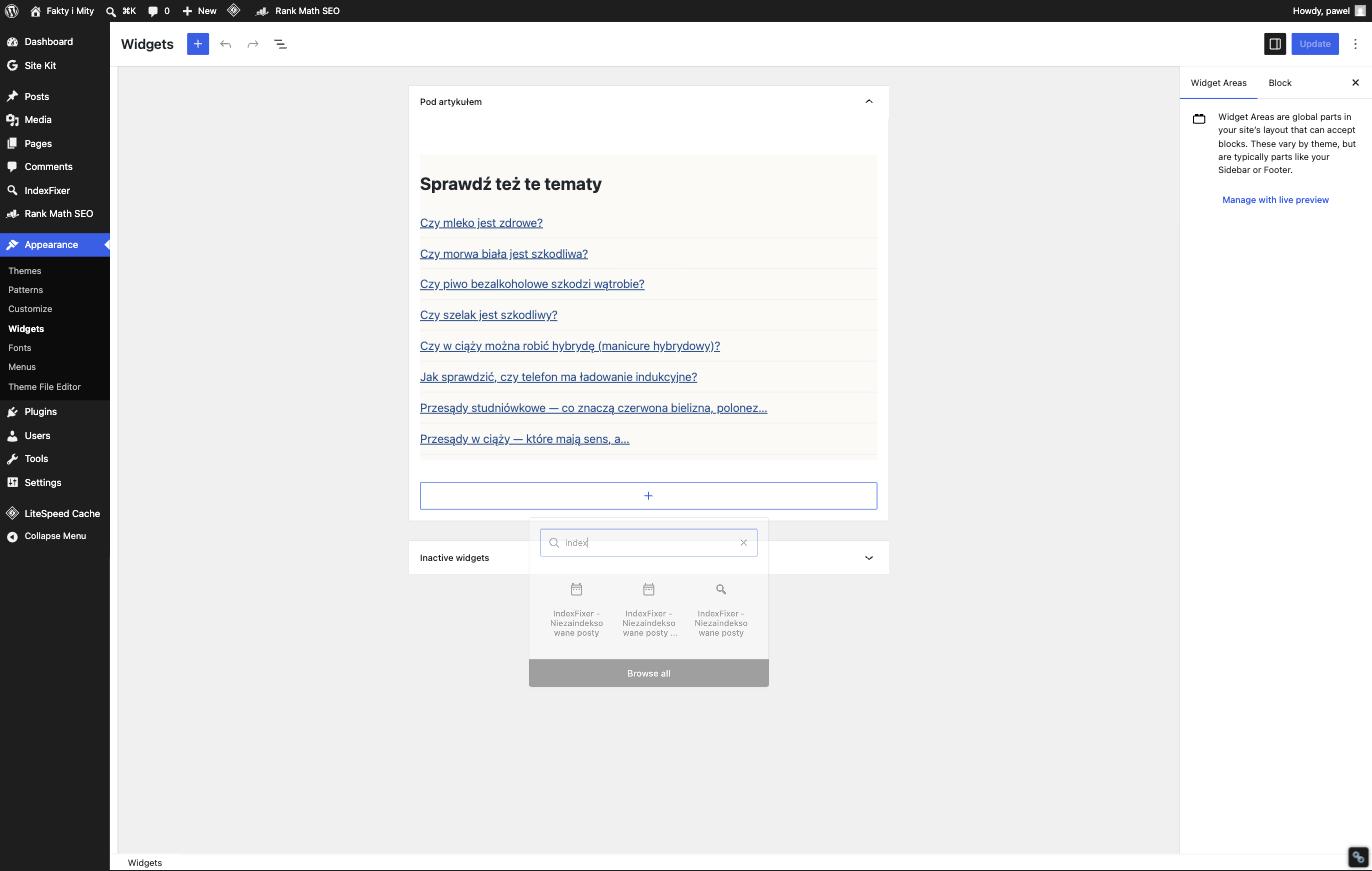
- Go to Appearance → Widgets (or edit your template in the Site Editor if your theme is block-based).
- Click + in the widget area where you want the list — footer or "below article" areas work great, the widget should be sitewide.
- Search for "IndexFixer" and pick IndexFixer — Not indexed posts.
- Give it a natural title (e.g. "You may also like" / "More to read"), set how many posts to show (5–10 is a good default), save.
6. History & alerts
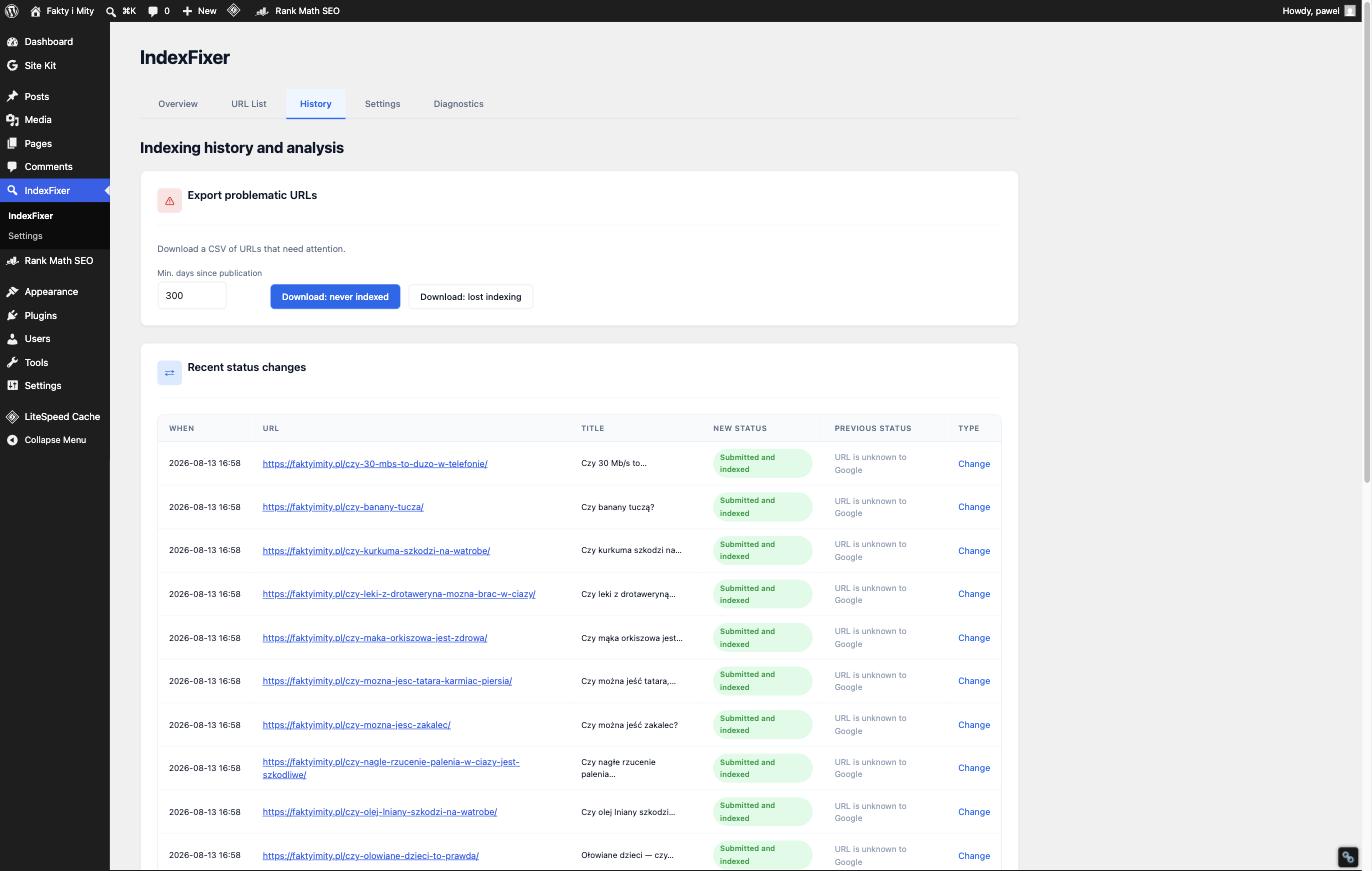
- Export problematic URLs — CSV of pages that have been published for at least N days and were never indexed, or that lost indexing. Your content-fix worklist.
- Recent status changes — every transition Google reported, with timestamp, old and new status. This is where you catch de-indexing early: a page flipping from "Submitted and indexed" to anything else deserves attention.
7. Settings & Diagnostics
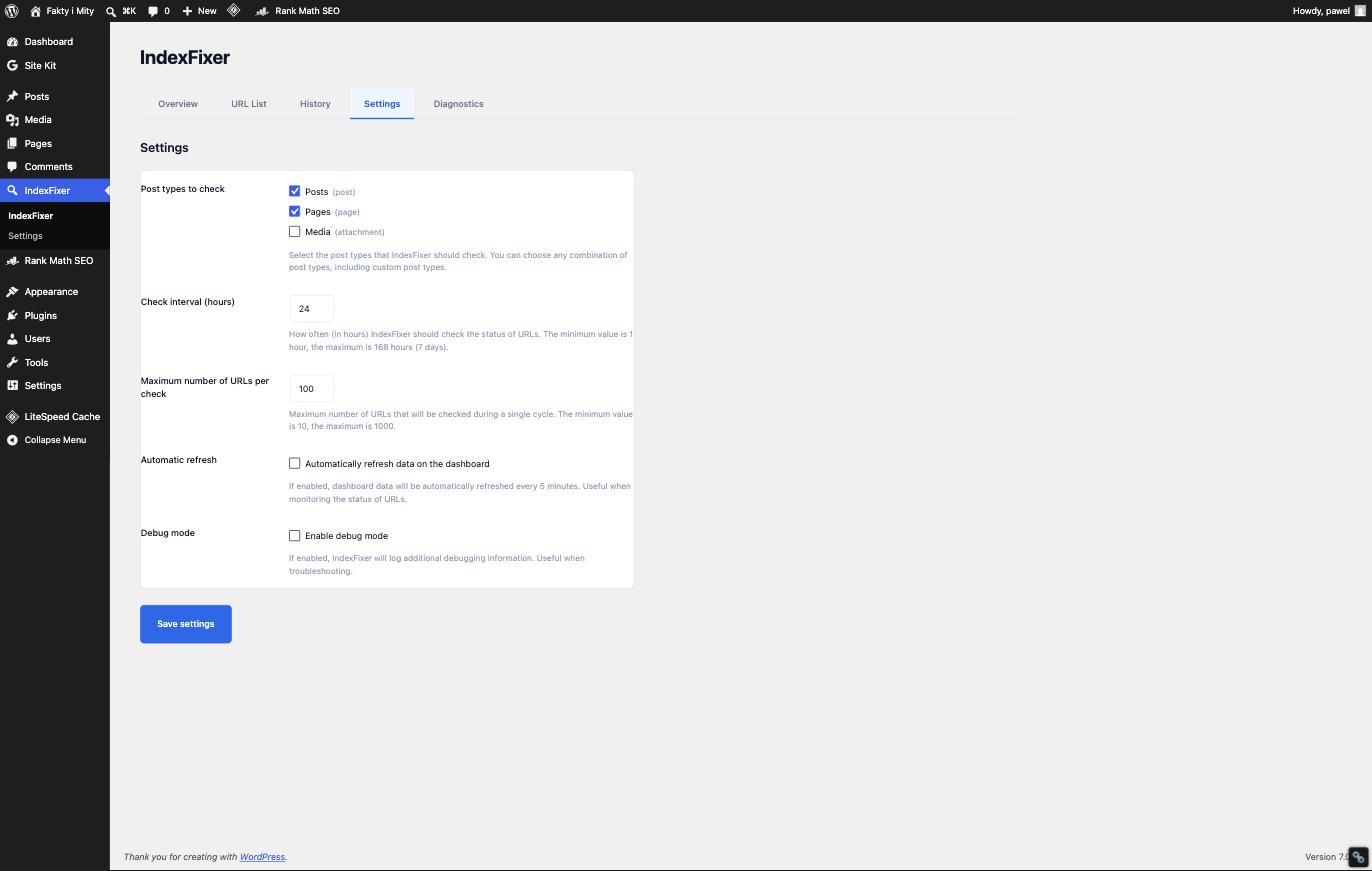
| Setting | What it does |
|---|---|
| Post types to check | Which content types IndexFixer tracks (posts, pages, media, any custom post type). Un-ticking a type removes its URLs from tracking. |
| Check interval (hours) | How often the plugin refreshes data. 24 h is the sweet spot — Google's own data doesn't move faster. |
| Max URLs per check | Batch size per refresh cycle. |
| Automatic refresh | Auto-reloads dashboard numbers every 5 minutes while you watch. |
| Debug mode | Verbose logging for troubleshooting. Leave off. |
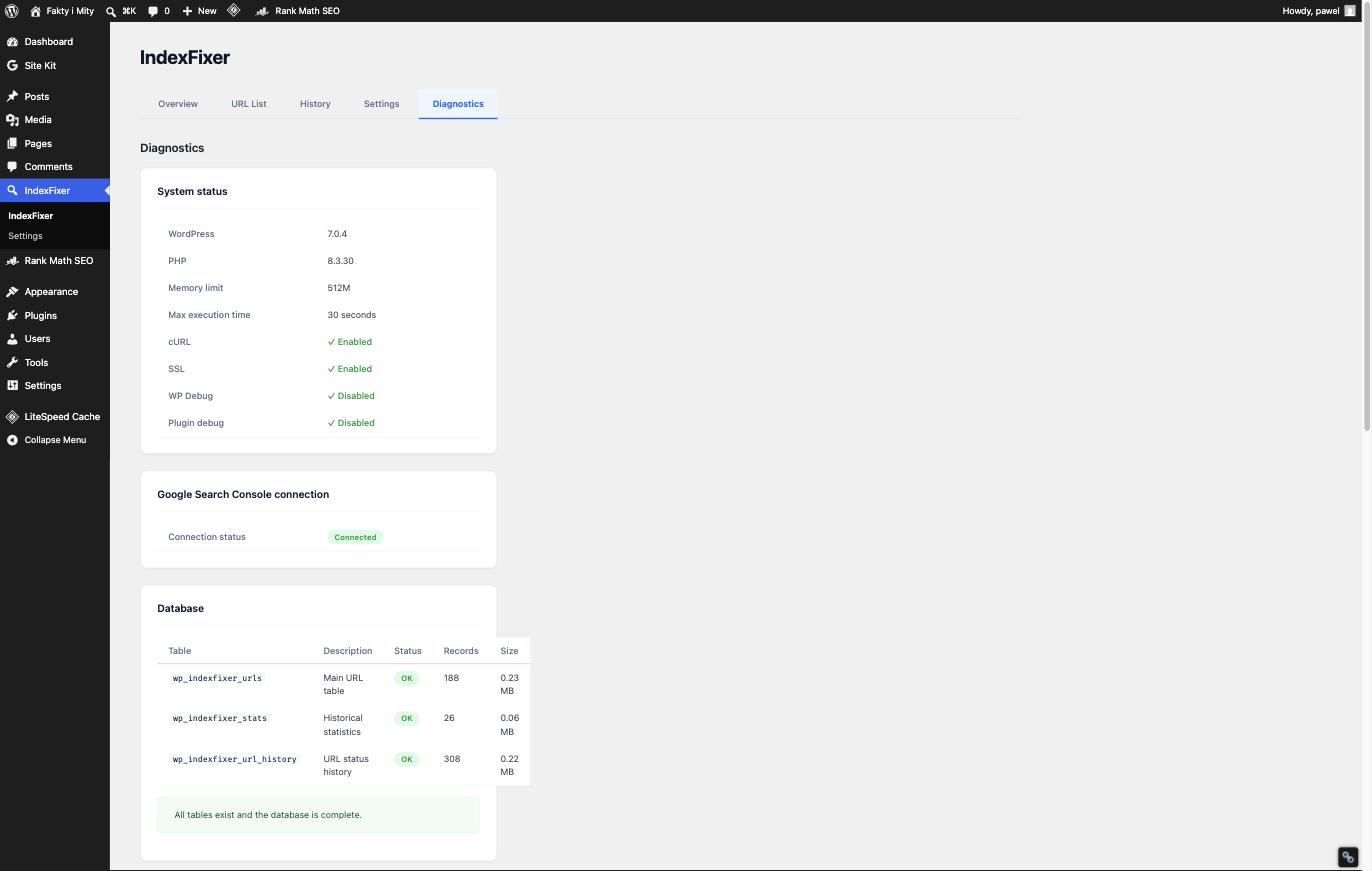
The Diagnostics tab shows system health: PHP/WordPress versions, Search Console connection status, and the plugin's database tables. If anything ever looks wrong, this is the screenshot to send us.
8. FAQ
How fast will my pages get indexed?
IndexFixer makes Google find your un-indexed pages (widget) and tells you the moment status changes. New posts are checked right after publishing. Indexing itself is Google's decision — for "Crawled — currently not indexed" pages, improving the content is usually part of the fix.
Why is CHECKED below 100%?
Google's URL Inspection API allows up to 2,000 checks per day per site. Large sites simply need a few days for the first full pass. Widget URLs and new posts always jump the queue.
Do I need a Google Cloud project or an API key?
No. You grant read-only Search Console access with two clicks; our servers handle the rest.
Something's not working — where do I get help?
Email [email protected] — attach a screenshot of your Diagnostics tab if you can.